Difference between revisions of "OHC Firmware"
| Line 51: | Line 51: | ||
== Firmware for Sheffield Robotics OHC == | == Firmware for Sheffield Robotics OHC == | ||
| − | + | To upload the OHC firmware to the [[Hardware_-_Overhead_Controller|Sheffield Robotics OHC Boards]], it is possible to follow the same steps presented in the section above (''Upgrade to OHC Firmware 2.0'') using a different hex file: ([[Media:Ohc-arduino-16mhz.hex|Ohc-arduino-16mhz.hex]]). | |
| − | + | ||
| − | + | ||
| − | + | ||
| − | + | ||
| + | The Sheffield Robotics OHC firmware source code is similar to the firmware for the K-Team OHC boards (available on GitHub: https://github.com/acornejo/kilolib). | ||
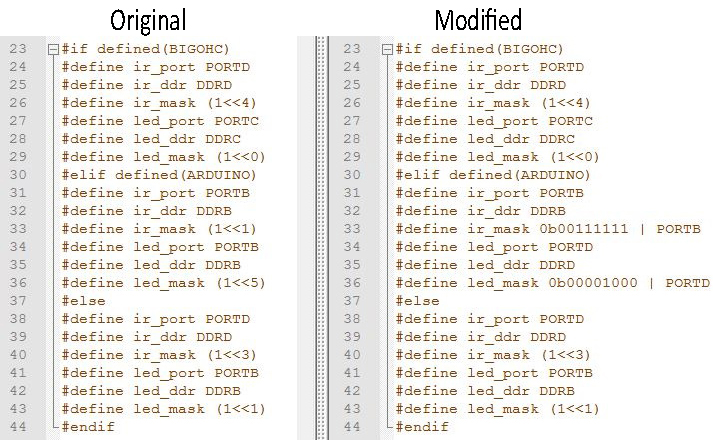
| + | The lines 33-36 of the ohc.c file are changed as in the Figure below. Instead of sending the signal only to the 2nd bit of PORTB, the code to send the signal to the first bit changed to send it to 6 bits of PORTB of the microcontroller (line 33: #define ir_mask 0b00111111|PORTB). Also, the LED (port and pin number) changed to indicate when the control board is sending IR messages (lines 34-36, pin 4 on PORTD). | ||
[[File:NewOhcfirm.jpg|The original and modified version of the source code of the OHC.]] | [[File:NewOhcfirm.jpg|The original and modified version of the source code of the OHC.]] | ||
Revision as of 11:32, 19 September 2017
We recommend to use the firmware 2.0, which has a more stable code, more supported communication interface and allows working with Linux and MacOS. Additionally, most of the tools provided in this website require the firmware 2.0 to work properly.
Contents
Upgrade to OHC Firmware 2.0
Most of the information reported here below come from (and can be found also on) the kilobotics website (https://www.kilobotics.com/documentation).
- NOTE:
- You will only need to do this once. If you already have the latest controller firmware and bootlader installed, then you can skip the next steps.
We recommend doing the firmware upgrade from a Linux machine.
Here below, the steps to upgrade the kilobot firmware:
- 1. Setup of your Linux machine installing avrdude. For Ubuntu, use the following command:
-
sudo apt-get install avrdude
-
- 2. Download the file controller.hex
- 3. Set the OHC jumper to "internal" mode as in this Figure
- 4. Connect the OHC to the PC through Usb
- 5. Run (from the directory containing the controller file) the update command:
-
sudo avrdude -p m328 -P usb -c avrispmkII -U "flash:w:controller.hex:i"
-
- 6. If you succeed, the terminal message should say:
Fuses OK. avrdude done. Thank you.Similarly to this screenshot.
Troubleshooting
- 1. Problem: Your system does not have the module m328 to update the kilobot firmware.
- Solution: Edit the file /etc/avrdude.conf and add at the end of the file the text of this file: avrdude.conf.m328
Firmware 1.0
In case needed, here you can get the firmware 1.0 (from K-team): OhcFirstFirmware.hex
Links
For further information, check the kilobotics website: https://www.kilobotics.com/documentation
The source code of the firmware (both of OHC and kilobots) can be found here: https://github.com/acornejo/kilolib
Firmware for Sheffield Robotics OHC
To upload the OHC firmware to the Sheffield Robotics OHC Boards, it is possible to follow the same steps presented in the section above (Upgrade to OHC Firmware 2.0) using a different hex file: (Ohc-arduino-16mhz.hex).
The Sheffield Robotics OHC firmware source code is similar to the firmware for the K-Team OHC boards (available on GitHub: https://github.com/acornejo/kilolib). The lines 33-36 of the ohc.c file are changed as in the Figure below. Instead of sending the signal only to the 2nd bit of PORTB, the code to send the signal to the first bit changed to send it to 6 bits of PORTB of the microcontroller (line 33: #define ir_mask 0b00111111|PORTB). Also, the LED (port and pin number) changed to indicate when the control board is sending IR messages (lines 34-36, pin 4 on PORTD).
